Category Archives: Picnic Food

Italian Rice Salad with Tuna, Vegetables and Cheese

At the buffet served after the OIB graduation ceremony held at the CIV tonight – I was there to help with the aperitif and the buffet – there was a delicious rice salad which was contributed by the mum of a student in the Italian section.

Here’s the recipe, as I remember it, which she told me as we served the crowd so I hope I’ve got the details right !

Italian Rice Salad

Cooked and cooled rice (from a region in Italy, if I understood her right, near the one that arborio rice come from) tossed with canned tuna (with the oil), olives, capers, very finely sliced raw carrots(or they may have been very lightly steamed), tomatoes (optional) and small pieces of provolone cheese. Though I forgot to ask if she had used any herbs, I don’t think there was any  seasoning in the salad other than salt.

I am going to try this soon as it would make such a simple, fresh and delicious summer meal though I’ll have to figure out first what the rice variety she’d used might be.  I wonder if it is Carnaroli?  The name she used sounded sort of like that from what I remember and when I google Arborio, I find many references to the Carnaroli rice variety as a great base for risottos and salads – indeed for the former it appears to be a better choice than Arborio.

Leave a comment

Filed under Easy One Pot Cooking, Picnic Food, Quick Meal Ideas, Rice-Pulavs,Biryanis,Baaths, Salads

Chicken Pulav(2)

This recipe is quite similar to the other one I’ve used a couple of times to make chicken pulav for the boulangerie. The chief difference is that this one requires tomatoes, while that other recipe calls for lemon juice.

I did without an ingredient that the original recipe – which is from Chef Sanjeev Kapoor’s “Khazana of Indian Recipes” – requires  and that’s chicken stock.

I suspect that would add a great deal to the taste but never having got the hang of how to make stock, I made this pulav yesterday with water instead.  Fortunately it passed muster with both Patrick the boulanger – I will be making this for him next Tuesday – and Maria, our guest last night at dinner.

Maria’s daughter was away this week on the same school trip as Indira and since her husband is traveling on work, we asked her to eat with us yesterday.

Dinner was this chicken pulav, rasedar aloo tamatar, salad with mesclun, red bell pepper,corn and asparagus and multi-cereal baguette. I planned the meal this way because I wanted to suggest the first two dishes to Patrick for next week, along with some carrot salad. Luckily he liked both and Maria appeared to enjoy her dinner too so that turned out okay !

Here’s my adaptation –

Chicken Pulav

2 cups of Basmati rice

500 gms of boneless chicken, cut in to small chunks

3 teaspoons each of ginger and garlic paste

1/2 a teaspoon of Kashmiri chili powder


Leave a comment

Filed under Easy One Pot Cooking, Picnic Food, Rice-Pulavs,Biryanis,Baaths

Rava Idlis

This is another of Pooja’s recipes, adapted a little by me.

Maybe I ought to start paying her a royalty for all these inspirations !

Thanks to this one, the girls loved their gouter today and I am looking forward to having the idlis for dinner tonight, with sambhar.

In the background – Ruhin’s artwork, from a year or so ago, which Boudi creatively transformed in to a set of place mats for us.

Rava Idlis

1 cup of suji/semolina/rava, slightly roasted

1 and a 1/2 cups of smooth yogurt

1 large carrot, finely grated

1 or 2 tablespoons of cashew nuts, sliced in half

5-6 curry leaves, finely chopped

1/2 a teaspoon of mustard seeds

2 teaspoons of sunflower oil

salt to taste

1 teaspoon of Eno fruit salt

Mix the yogurt in to the rava, adding a little water – about 1/2 to 1/3 of a small cup – if the batter seems too thick.

Heat 2 teaspoons of oil in a small frying pan, then add the mustard seeds. When these start to pop, add the curry leaves, fry for a few seconds and then pour this mixture in to the rava batter. Now mix in the rest of the ingredients and stir thoroughly.

Lightly oil the idli mold, pour about 2 tablespoons of batter in each section and steam the idlis till done. This will take about 15 minutes.

Take the idlis out with a butter knife.

The top of some of the idlis was a little damp still when I took them out of their molds but the moisture dried up in a few minutes.

Leave a comment

Filed under Breakfast Ideas, Picnic Food, Quick Meal Ideas, Starters and Snacks

Curried Potatoes aka Rasedar Aloo Tamatar

Shri loves this potato curry – he calls it aloo shak, which is probably an Indori name for it since he talks fondly of having eaten this many times in the sarafa bazaar of Indore – with puris and if he had his way this is what I would make each time we have friends over for a meal.

Yesterday, for dinner with Vishal and Shefali’s family, we had this curry with palak puris.  And it was so pleasing to see Twisha and Vayun enjoy the carrot salad I had made to go with the aloo-puri as much as Shri, Indira and Noor do.

Curries Potatoes/Rasedar Aloo Tamatar

600 gms of potatoes (enough for 4-6 people)

300 gms of tomatoes or an equivalent amount of canned tomato pulp (about 6 tablespoons)

4-5 tablespoons of oil

1/4 teaspoon each of the ingredients of paanchphoran – mustard seeds, cumin seeds, fennel seeds, nigella seeds and fenugreek seeds

1/2 teaspoon of turmeric powder

1/2 or 3/4 teaspoon of coriander powder

1/4 teaspoon of kashmiri red chilli powder (or to taste)

2 small cloves of garlic, peeled and chopped fine

1 teaspoon of kasoori methi and/or 1/2 a teaspoon of garam masala (optional)

1 large dry red chili (optional), broken in half

salt to taste

fresh, green coriander,chopped fine

Leave the tomatoes in very hot water – freshly boiled – till their skin comes off easily.  Then drain and leave aside to cool.

In the meanwhile cook the potatoes, till they are soft, in a pressure cooker. When the cooker has cooled a bit, open the lid, drain the water, take out the potatoes in a colander and leave aside to dry and cool.

Peel and chop the tomatoes in to very fine pieces.

When the potatoes are cold, peel them and dice them in to small pieces.

In a large frying pan, heat the oil and put in the  red chili, the mustard seeds and the nigella seeds. When the mustard seeds begin to pop, add the fennel seeds, fry for a couple of seconds, then add the garlic and fry for a few seconds till the garlic loses it’s raw look. Now add the cumin seeds and fenugreek seeds and fry for just another couple of seconds else the fenugreek seeds can burn and will develop a bitter taste.

Add the tomatoes next and cook on medium heat till their juice starts to dry up. Then add all the dry spices and fry for a minute or so, till the oil starts to appear on the sides of the mixture. Now stir in the kasoori methi and fry for another few seconds.

Add the potatoes, along with salt. Fry for a few minutes till the potatoes are  well-coated with the tomato mixture.  Then add about 2 cups of water and simmer the curry for a while till the gravy is as thick as you like (add more water if needed). Once way to ensure the curry is well-done is to let it simmer, stirring occasionally, till the surface starts to acquire a rich red color/glaze.

Garnish with green coriander , if you haven’t used kasoori methi.

Leave a comment

Filed under Curries, Everyday Subzis, Picnic Food, Quick Meal Ideas

Mint- and Coriander-flavored Grilled Chicken

This is another recipe adapted from “Tikkas & Kebabs”, one of the “Chef’s Special” series published by Lustre Press in India.

I have wanted to try this one since a long time because of the very clear memory I have of the delicious mint-flavored chicken tikkas I ate once  in a restaurant in Delhi.

The girls loved this dish, when I cooked it for lunch last Wednesday.  When I told the boulanger about it – I wasn’t able to take any for him to taste because the girls and I polished it all off – he seemed to like the idea of it and has agreed to try it one Tuesday soon, instead of the usual tandoori chicken.

10-12 chicken drumsticks

100 grams of yogurt

2 tablespoons of lime juice

1 tablespoon of garlic paste

3-4 teaspoons of ginger paste

1 teaspoon of cummin powder

1 teaspoon of coriander powder

1 teaspoon of garam masala

4 tablespoons of oil

1/4 cup of finely chopped fresh coriander leaves

2 tablespoons of finely chopped mint leaves

4-5 tablespoons of melted butter, for basting the chicken

salt to taste ( two teaspoons or a little less, for this quantity of chicken, works for us)

Mix the ginger and garlic pastes with the salt and lemon juice.

Skin the chicken, make 3-4 incisions on each piece, toss the pieces thoroughly in the lemon juice mixture and  leave them in this marinade for 30 minutes in a large bowl.

In the meanwhile, strain the water in the yogurt by leaving it in a fine sieve for 15-20 minutes.

Mix the rest of the ingredients – except the butter – in the yogurt. Add this mixture to the chicken pieces and coat them well in it. Leave the chicken in this marinade for at least 8-1o hours, turning over the pieces once during this time.

Heat the grill to about 240 degrees Celsius, then place the chicken on a wire rack and grill till done (this takes about 40 minutes in my oven), turning the pieces over a couple of times during this time to make sure they are evenly cooked and basting with butter each time.

I love the mild but distinctive flavor of herbs here.

Leave a comment

Filed under Baked Main Meal Dishes, Picnic Food, Starters and Snacks, Versatile Accompaniments

Potato-stuffed Bread Rolls

Last night, dinner consisted of exactly the same combination that Ma often made for dinner in the winter when we lived in Bokaro – vegetable soup, with these aloo-filled bread rolls on the side.

Ma never served these rolls on salad leaves, but I guess I felt that a few leaves from the bag of mesclun would stop me from thinking about the significant amount of oil which the bread must have soaked up when I fried the rolls !

I actually made these as a sort of  trial-run, since I wanted to take a couple to the boulangerie.

This is another of Pooja’s suggestions and has been a winner too.

Next week’s order from the boulanger is for these rolls and vegetable korma.

April 13th 2010

I did, as planned, hand over bread rolls and korma for 10 to the boulanger this morning. But I have spent the last few days wondering if  this has really been such a good idea, to introduce the girls to this snack (well alright,my own tendency to over-indulge once the rolls are made has been worrying me too).

The combination of bread and potatoes which is then deep fried is surely not a recipe for good health.  I did substitute white bread with multi-cereal bread but then commercial versions of the latter are not the real deal at all.

Then, in what must surely be a Sign, a news story that  highlights once again the problems with high glycemic index foods – of which potatoes and white bread are common examples -caught my eye first thing this morning.

http://edition.cnn.com/2010/HEALTH/04/12/glycemic.diet.heart/?hpt=T2
http://health.usnews.com/health-news/diet-fitness/diabetes/articles/2010/04/12/eating-the-wrong-kind-of-carbohydrates-increases-heart-disease-risk.html

So while I fried a few rolls – which have been hugely popular with the girls – this evening for gouter –  with the leftover potato stuffing, I decided that I am not going to include this particular recipe here.

They’ll just have to call me for this one, if they do remember these rolls when they are older. For my part, I am not going to make these again in a hurry !

Leave a comment

Filed under Picnic Food, Starters and Snacks, Versatile Accompaniments

Tandoori Chicken

Though what this is , actually, is oven-grilled chicken.

The girls  have always called it “red” chicken after the color of the excellent chicken that Jitender and Neelam always make at their barbeque parties and which Indira so looks forward to eating when we are invited !

The marinade – and therefore the taste of the chicken – I prepare is different from theirs though and is adapted from Sanjeev Kapoor’s recipe in his  “Khazana of Indian Recipes”.

Tandoori Chicken

800 gms of chicken drumsticks

1 or 2 teaspoons of kashmiri chilli powder

4 tablespoons of lime juice

200 gms of yogurt

4-5 teaspoons each of ginger and garlic pastes

3/4 teaspoon of garam masala powder

salt to taste

about 100 ml of melted butter

2-3 limes, cut in to wedges

Skin and wash the chicken, then make cuts in several places on each piece.

In a flat bowl, mix half the lime juice and Kashmiri chilli powder and toss the chicken pieces in this mixture. Keep aside for 30 minutes.

In the meanwhile, leave the yogurt in a very fine sieve – to drain the whey – for 15-20 minutes.

Then mix the yogurt with the rest of the ingredients (except the butter),  toss the chicien pieces in this marinade to coat them well and refrigerate for 6-8 hours.

Pre-heat the grill to 240 degrees C, then place the chicken pieces at the top of the oven and cook till they are done, turning them over a couple of times so that all the sides are cooked evenly. Apply butter lightly with a brush each time on the surface just below the grill.

This dish is best eaten hot from the oven and lime wedges are a must-have accompaniment, for the juice to be squeezed on to each piece as it’s eaten.

Leave a comment

Filed under Baked Main Meal Dishes, Picnic Food, Starters and Snacks, Versatile Accompaniments

Mangori – Green Moong Daal Vadas

This is another great dish that I learned to make from Atto.  On our visits to her home in Indore, I used to look forward to eating these – which she made each time – hot and crispy as they came out of the karahi.

These vadas have always been very popular whenever I have made them for get-togethers with friends here so when Pooja suggested I make these for the boulangerie, I thought that a great idea.

And indeed, the boulanger simply loved the mangoris I took for him to taste a couple of days ago.

So this is one of the things I’ll make for next week’s order, along with some vegetable biryani and tandoori chicken.

This recipe is adapted from Atto’s.  I also  add fennel seeds as Pooja does since this adds a wonderful flavor.

Mangoris

1 cup of whole green moong daal (or split/chilka moong)

1/4 teaspoon of fenugreek seeds

1 teaspoon of ginger paste

1 onion , chopped very fine

3 teaspoons of fennel seeds

1 and a 1/2 teaspoons of salt (or to taste)

oil to deep fry

Soak the lentils with the fenugreek seeds in 3 cups of water for at least 12  hours. then drain the water and grind the daal with as little water as possible to a smooth paste. Take this out in to a bowl and mix in the salt, the chopped onion, the fennel seeds and the ginger paste.

Heat about 400-500 ml of  oil in a deep frying pan till it almost reaches smoking point. Drop small portions of the batter – about 1 or 1/12 teaspoons each – to the oil and fry  the vadas till they are brown – they will be need to be darker than a golden brown so as to be well-cooked inside – and crisp.

These are delicious enough by themselves; coconut chutney on the side would be the icing on the cake.

Leave a comment

Filed under Picnic Food, Starters and Snacks, Versatile Accompaniments

Tuna and Potato Cutlets

I first tasted these delicious fish cutlets at a potluck meal to which Jinia brought this dish as one of the starters.

I got the recipe from her when I made them for a “Cuisine de Monde” day at school when Indira was in the maternelle.   She had suggested that I make these, when I discussed the event with her, because in her experience, she said, this was a popular finger food with kids. And she was right about that – most of the children loved them, I remember, as did the mothers who were there.

I hadn’t made them again since then, but today as I mixed a salad for lunch and added some canned tuna to it, I was reminded of these cutlets. So I thought that instead of racking my brains trying to think of another potato-based dish for the boulangerie – since I don’t feel like making aloo tikkis or batata vadas again next week but potatoes do seem to be popular – I would make these cutlets, with the rest of the tuna in the can I opened this afternoon, for the girls’ gouter and take a couple of them to the boulangerie for Patrick to taste.

The girls, especially Noor, liked them a lot; I’ll find out tomorrow whether these will be part of the order for next Tuesday.

Tuna and Potato Cutlets

For 10 small cutlets –

90 grams of tuna (packed in water), drained

3-4 small potatoes

1 small onion, chopped fine

1/2 teaspoon of cumin powder

1/2 teaspoon of coriander powder

salt to taste

1/2 red chilli powder (optional) or 1 small green chilli, chopped fine (optional)

1 and a 1/2 tablespoons of cooking oil

2 eggs, whisked in a deep bowl (in which the cutlets can be dipped in to the egg)

6-7 tablespoons of breadcrumbs

Enough oil to deep-fry the cutlets

Boil and then peel the potatoes. Drain the tuna and break up the flesh with a fork. In a small frying pan, heat the oil, fry the onions till they are translucent, then add the tuna and cook for a just a little while till it is dry. Mix in the spices and cook for another minute, then take off the heat.

When the tuna is cool, mash in the potatoes and mix everything together thoroughly. Form 10 cutlets from this mixture. Dip them in the egg, then roll in the breadcrumbs and deep-fry till they are golden brown.

This really does transform plain, canned tuna in the nicest way.

Leave a comment

Filed under Picnic Food, Starters and Snacks, Versatile Accompaniments

Chicken Pulav(1)

I wanted to persuade the boulanger to try something other than chicken curry – though that does seem to work well with his clients – for next week’s order.

So since I had some boneless chicken left over in the fridge, I used it to make chicken pulav. The girls liked it a lot and fortunately there is enough that they can have it for dinner tonight.

As for the boulanger, his reaction was so pleasing.  He said, without tasting either the pulav or the upma (which is what I have had made for lunch today so I took some of that too, for him to taste) that he would like me to make both these things for next week; when I asked him to taste both dishes so as  to be sure, he said that wasn’t necessary since “whatever you bring is all delicious “.

Now, I have my fingers crossed that his clients feel the same way next week 🙂

This recipe is adapted from one in Rocky Mohan’s “Art of Indian Cuisine”.

Chicken Pulav

2 cups of basmati rice, washed and soaked in cold water for 30 minutes and drained thereafter

400-500 gms of boneless chicken, cut in to small pieces

3 teaspoons each of ginger and garlic pastes

2 medium sized onions, chopped fine

4-5 cloves

4 pods of green cardamom

3-4 small sticks of cinnamon

2 green chillies, finely chopped

4 tablespoons of sunflower oil (or 3 of oil and 1 of ghee)

To be mixed together:

150 ml of yoghurt

1 teaspoon of turmeric powder

1/2 a teaspoon of red chilli powder

1 tablespoon of coriander powder

1/2 a teaspoon of freshly ground black pepper

the juice of 1 large lime

salt to taste

To make the Pulav:

In a large frying pan, warm the oil and add the green cardamom, cloves and cinnamon. Fry for a few seconds till their aroma begins to be released.

Add the onions and fry till they begin to look translucent.

Now add the pastes and the green chillies (optional; I skipped this) and fry again till everything turns a golden-brown color.

Add the chicken pieces next, turn up the heat a little and fry till they are golden all over.

Add the yogurt mixture, season with salt and mix everything together well. Cover the pan, lower the heat and cook till the chicken is tender and the water in the yogurt dries up, turning the mixture over every once in a while.

Add the rice, mix it in thoroughly, then add 3 and a half cups of hot water. Cover the pan, turn up the heat and bring the water to a boil. Now reduce the heat again to quite a low setting and simmer till the rice is cooked and all the water is absorbed.

Leave the pulav covered for a while before serving it as I feel this allows the flavors to develop further.

This is so quick and easy to make; a great alternative to biryani.


Leave a comment

Filed under Easy One Pot Cooking, Picnic Food, Quick Meal Ideas, Rice-Pulavs,Biryanis,Baaths

Sevai Upma

A long time ago, Priti and I shared an apartment in Bhopal for three months, while we worked on a project at the BHEL factory.

One of the many things that made it such a memorable time was the cooking we did together.

It was also where I got my tea habit, but that is another story.

This post is about the delicious sevai (vermicelli) upma that Priti used to make, the taste of which has stayed with me all these years.

So recently I asked her to mail the recipe to me  since I had forgotten both the process and the proportions of the various ingredients.

She sent me a picture too –

Here’s what she told me to do, in her words, with  some variations of my own in parentheses.

1 generous tbsp of oil to roast the vermicelli in
1tsp mustard seeds
2-3 carrots julienned
1 green capsicum  julienned (I used red bell pepper today)
julienned hari mirchi (I had no green chillies so I used half a whole red chilli)
1 sliced onion (optional and so I cooked the upma without)
1 cup measure of  vermicelli (I used a thicker variety since the usual kind was not available the day I went looking for it)
6-7 curry leaves
2 tbsp shelled peanuts (optional and so I cooked the upma without)
lime juice
salt

Steps :
1. Roast the vermicelli in the oil on a thick bottom/non stick pan.  You have to keep stirring the vermicelli otherwise it tends to burn quickly. I like to roast it fairly dark brown but not burnt-it’s a fine line (I agree – I found myself stirring constantly !)
2. Set aside the roasted vermicelli. In the now empty pan, add another 1.5 tsp (I used a little more) of oil , then add mustard seeds and curry leaves. If you are using onion cook them until brown. Then add the vegetables, stir 4-5 times (I covered the pan for a few minutes to cook the vegetables, stirring every once in a while)
3. Add  2 cups of water, salt,the vermicelli and the peanuts .
4. Cook, covered, on low heat. Watch for the water- if it dries out and the vermicelli does not become almost double it’s original size then add some more. Sometimes I just turn off the stove and let it cook in the steam.
5. Add lime juice; the vermicelli tend to unstick once the lime juice is added so you can add the juice, leave the upma covered for a couple of minutes and then transfer to the final serving dish.

Here’s how my version looks, which I have made for lunch today.

Some of the girls’ reactions –

After the first forkful, Indira said “ummm, very nice !”

A few minutes later – “It’s delicious, and I am going to call it pasta upma” (I guess that because the thicker vermicelli I used does it make it look

a bit like spaghetti !)

And Noor says “It’s excellent, this noodles upma“.

Thank you, Priti Aunty, for a very successful lunch.

1 Comment

Filed under Breakfast Ideas, Easy One Pot Cooking, Picnic Food, Quick Meal Ideas, Starters and Snacks

Pasta Salad with Broccoli,Red Bell Pepper and Feta Cheese

I remember that the Italian husband of one of Shri’s colleagues brought a delicious pasta salad, that had feta cheese in it, to a barbeque last summer.

So when I made pasta salad for lunch today, I made it like that one, which had no sauce. The girls were  therefore not too excited when they saw their plates at lunch especially since I had added broccoli to the salad ; some “Pesto Rosso” (a Barilla sauce they adore) would have helped make that vegetable more appealing, I guess.

But despite the broccoli – which, to be fair, they have been eating more easily recently – they ate without fuss or too much comment and I really appreciated that. And hopefully the Feta cheese made it a little better at least for Indira.

I did think that the dressing of olive oil, lime juice and dried basil flakes left the salad somewhat bland. So I added chilli-infused oil to my portion and that certainly gave it a nice kick and flavor. So I would probably add chilli flakes to the dressing if I make this salad again. I think it would bring alive both the Feta cheese and the broccoli.

150-200 grams of pasta

200 grams of broccoli florets, cut in to smaller portions

1 small can of sweet corn, drained

200 grams of feta cheese, cut in to little squares

olive oil

lime juice

1 red bell pepper, sliced fine

salt, dried basil flakes and chilli flakes to taste

Leave a comment

Filed under Picnic Food, Quick Meal Ideas, Salads

Chickpeas Salad aka Chickpeas Sundal

This is one more Indian recipe that is easily passed off as a salad.

I love how the chickpeas work here equally well with a variety of fruits – I sometimes add mango, or peach when it is in season, and tonight I added finely chopped orange segments.

We had this sundal for dinner tonight with tomato-pumpkin-broccoli soup and some nice multi cereal bread from the boulangerie.

Chickpeas Salad or Chickpeas Sundal

1 can of chickpeas, drained well

3-4 tablespoons of freshly grated coconut

1 mandarin orange, peeled and divided in to its’ segments(or 1 peach, peeled and diced fine, or an equivalent amount of diced mango)

1 large sprig of curry leaves

1 teaspoon of freshly grated ginger

1/2 a teaspoon of mustard seeds

salt to taste

Indira thought tonight, at first glance, that the fruit in the salad was pineapple. Which has given me the idea to try it with that fruit the next time.


Leave a comment

Filed under Easy One Pot Cooking, Picnic Food, Quick Meal Ideas, Salads, Starters and Snacks, Versatile Accompaniments

Medu Vadas

I got a small kick out of making these vadas, a couple of days ago, because they are the kind that my Ma would always make i.e the sort with the little hole in the center. That little detail has always been tricky for me to get right but this time I made the batter in my small electric blender, instead of in the blender of my food processor. So I managed to grind the lentils just the right thickness to be able to form the required shape (though I realized I am quite out of practice, as I made these !) .

Why the fuss about the shape, though, when the alternative – vadas that are a smooth round shape – would do just as well and certainly taste exactly the same?And I do in fact make the latter kind whenever I make these vadas in larger quantities, on occasions such as the children’s birthday parties .

Well, just because it is one of those little traditional touches that I somehow feel need to be preserved, even if through infrequent use, rather than forgotten completely …

We had these with sambhar and green coconut chutney. Noor loves them, as does Shri, though Indira would much rather eat them in their dahi vada avtaar.

Medu Vada

1 cup of dhuli urad daal (skinless black gram lentils)

1/4 teaspoon of fenugreek seeds

1/2  teaspoon of freshly grated ginger

1/4 teaspoon of asofetida

1 teaspoon (or a little more) of freshly roasted cumin seeds

salt to taste

8-10 curry leaves, chopped fine

Wash the lentils thoroughly, add the fenugreek seeds and soak for at least 6 hours.

Drain the water completely. Grind the daal – taking about a half or a third of it at a time – in a blender/grinder, using as little water as possible , in to a thick paste. Mix in the salt, curry leaves, asofetida, cumin seeds and ginger and stir these in well with clean hands (this make for really soft vadas, according to experienced cooks like my Ma and Chanchal Aunty).

Fry the vadas now in medium hot oil till they are golden brown in color,forming each in to the required shape by hand.  To do this, either a) wet your palms well with a little water (keep a bowl filled with water handy for this as you’ll need to repeat the process after every couple of vadas), take 1 large spoonful of batter in to your left palm, flatten it a little, make a hole in the center and then turn the vada on to your right hand before sliding it in to the oil OR b) lift little portions – about 1 tablespoon – of the batter by hand and roughly forming them in to round shapes drop these in to the oil.

Serve these and eat these hot, when they are wonderfully crunchy on the outside.

Leave a comment

Filed under Breakfast Ideas, Picnic Food, Starters and Snacks

Carrot and Green Bell Pepper Pulao

One day I will cook a “pilaf”, just to be able to post about it so I get to use the word pilaf, which I love  because it has such an exotic ring about it !

In the meanwhile – this is the recipe for the pulao I wrote about last summer but which I haven’t made since, until this past weekend. I have adapted it from the original recipe which is in Viji Varadrajan’s “Samayal”, a cookbook about the cuisine of the Tanjore and Palghat regions of southern India.

In the summer last year it was Noor who said she loved this pulao. Then on Sunday it was Indira who wanted to know if there’s be enough left over for Monday. I guess that means we can put it in the Favorites Foods column.  Or at least for now, for they may change their minds in some weeks in their sometimes fickle way 🙂

(An update to that from 15 Sep 2010 – Indira said again, when we had this for dinner last night, that she loves this pulav)

The use of the podi is what gives it it’s distinctive, delicious taste.

Carrot and Green Bell Pepper Pulao

Basmati rice – 1 cup

1 large green bell pepper, sliced fine

3 medium sized carrots, peeled and diced in to thin half-moons

1 tablespoon of Pitlai podi

3/4 teaspoon of turmeric powder

lime juice, to taste (but at least 1 tablespoon)

3/4 teaspoon of mustard seeds

8-10 curry leaves

salt, to taste (or say about 1 and a 1/2 teaspoons for the rice and 1/2 a teaspoon to be added while cooking the vegetables)
Wash and soak the rice in cold water for 20-30 minutes, then cook it with a little less than twice the amount of water (I use an electric rice cooker and therefore add 2 and a half cups of water) with salt added in.

Let the rice cool before you start to cook the vegetables so that you are able to separate the grains of rice gently, by hand or with a flat spoon, without breaking the grains.

In a large frying pan, heat the oil, then add the mustard seeds and the curry leaves. When these begin to crackle, add the carrots and fry them on a medium high heat till they are soft enough without being mushy (i.e. they should retain a bite).  A few minutes before you think the carrots will be done, add the bell pepper slices and fry everything together till the latter are cooked (I prefer that these should retain a bite too) as well.

Add the salt, the turmeric powder and Pitlai podi and fry everything for another couple of minutes.

Now add the rice, mix it with the vegetables, then put the lime juice and  toss everything together gently but quite well over 4-5 minutes.

This makes a very nice meal with varan and salad, or just a raita in the summer.


Leave a comment

Filed under Easy One Pot Cooking, Picnic Food, Quick Meal Ideas, Rice-Pulavs,Biryanis,Baaths

Lemon Loaf

This turned out to be so much nicer than I’d expected.

For some odd reason I have never tasted a cake before with a lemon flavor and therefore I have always instinctively chosen to bake ones with other flavors – cocoa, dates, pineapple, raisins, apricots and even poppy seeds, but never lemon.

But Indira has often said that children at school love lemon cake, which has often made me curious about it’s appeal.  So last weekend when I needed to bake some dessert in a hurry to take to the school picnic, I decided to try this recipe. I thought I’d keep one tiny piece for all of us to try as it would a good way to find out what lemon tasted like  in cake and whether the girls liked it enough for me to make again. And if they didn’t, I figured I luckily didn’t need to worry this once about how the the rest of it would be used up since it was to be eaten by all the other folks at the picnic !

Well as it turned out, Shri and Indira – Noor had left already for a birthday party – both said “hmmm!! nice !” after eating their little portion of that piece so I made it again yesterday for gouter.

Noor, especially, seems to like it a lot, just as she does the orange loaf.

lemonloaf 002

Lemon Loaf

2 eggs

1/2 a cup of softened butter

1 cup of sugar

1/2 a cup of milk

1 and 1/2 cups of flour (either white or a mixture of wholewheat and white) with the following mixed in –

zest of 1 lemon

1 teaspoon of baking powder

For Glazing –

juice of 1 lemon

1/4 cup of sugar

Blend the butter,eggs and sugar in a mixing bowl, then stir the  milk in. Now gradually fold in the flour mixture. Pour the batter in to a loaf tin.

Pre-heat the over for 5 minutes to 18o degreesC, then place the loaf tin near the bottom shelf  and bake the cake for 45-50 minutes, till done.

A minute before the cake looks ready to come out, prepare the glaze by mixing the sugar and lemon juice, to combine them well,over moderate heat. Allow this mixture to simmer for 1/2 a minute (make sure not to let it get at all thick or syrupy) then take the cake out and pour the glaze all over, using a large spoon to spread it evenly.

When the cake has cooled completely, take it out very carefully as it will tend to stick a little to the sides because of the glaze.

This cake has a slightly moist softness because of the glaze and a beautifully even, mild hint of the lemon.

Simply yummy !

Leave a comment

Filed under Cakes and Muffins, Desserts, Picnic Food, RECIPES, Starters and Snacks

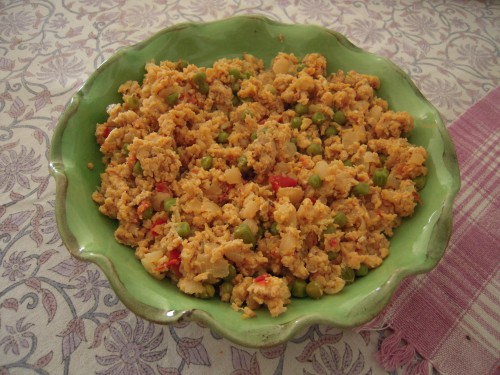
Desi scrambled eggs – Egg Bhurji

A desi version of scrambled eggs, this is a really versatile dish.

It makes for an indulgent Sunday breakfast, with toast and butter or even baguette and cheese and I make it for dinner  too sometimes, to go with soup, in the winter.  And the leftover portion is always good for a sandwich filling the next day, with a little ketchup tossed in 🙂  Shri and the girls really enjoy this dish and I am glad about that as it is one of those things that is so easy to make .

astoramachipsvihaanaloovadas 023

With or without the peas or green bell pepper, this is a delicious way to eat eggs.

Leave a comment

Filed under Breakfast Ideas, Easy One Pot Cooking, Picnic Food, Quick Meal Ideas, Versatile Accompaniments

Batata Vada

This is a Mumbai street food classic. Its is often sold stuffed in to a pav, and it is what I often ate for breakfast in the little tea and snack  shop on  our college campus  (the other stand out memory of that shop is the long string of fine but strong thread the Malayali owner kept hanging from a nail on the wall, which he would use to slice through boiled eggs every time someone ordered a plate of those !)

That canteen, and the memory of  the times it kept me going when I needed to get a cheap lunch, have given me a special fondness for this snack 🙂

The girls love it too, so some days ago when I could think of nothing else I made these vadas for their gouter.

astoramachipsvihaanaloovadas 010

Batata Vada

Luckily I had some green chutney  in the fridge and that goes really well with these vadas but ketchup is nice too, on the side.

Leave a comment

Filed under Picnic Food, Starters and Snacks

Sabudana Vadas

It was Indira’s birthday last Sunday and after a good lunch at the Petite Provencale and a very fun afternoon at  Aquasplash in Antibes, we came home to a dinner of sabudana vadas and the tomato-avocado-pesto sandwich that is Indira’s current favorite thing to eat.

These vadas may not be quite like the original – and I fried them a little too long this time I think, so that some were a little too crisp – but they do satisfy my craving for this food. I remember all the train rides from Mumbai to Pune when I traveled between those cities on work – I used to look forward so eagerly to the vendors bringing around hot, crispy sabudana vadas !

pastatroutwheatberries 012

For about sixteen small vadas

3/4 cup of sabudana (sago pearls)

2 medium sized potatoes

1/2 a cup of roasted, roughly crushed peanuts

1 (or 2) green chilli, chopped fine (optional)

1 tablespoon of fresh coriander leaves, chopped fine

1/2 a tablespoon of lemon juice

salt to taste

enough oil – at least 400 ml – to deep fry the vadas

1 teaspoon of fresh, grated ginger(optional as well; the reason I put this in most things I cook is because I trust my Ma’s notion that ginger improves the digestion of pretty much any food. And since these vadas combine two starches – sago and potatoes- they are a prime candidate for this ingredient I feel)

Soak the sabudana, in just enough water to cover it’s top, for 3-4 hours. At the end of this time, the sabudana will have typically soaked in all the water; else drain any excess water (though this is unlikely to occur if you use only enough water to cover the sago pearls)

In the meanwhile cook the potatoes  in the microwave oven (this way there will be no risk of their becoming sticky or retaining any water, which can cause the vadas to break) then after they have cooled peel their skins off and mash them in a bowl.

Add the rest of the ingredients, combine everything well and divide the mixture in to four equal portions. From each of these, make 4-6 equal sized balls and flatten them by pressing gently between your palms.

Fry the vadas in medium-hot oil till golden brown (so a little less brown than the ones in the picture).

On a rainy day, this is heaven.

Leave a comment

Filed under Picnic Food, Starters and Snacks, Versatile Accompaniments

Pretty Pasta Salad !

This is a personal favorite, one that I would love to make more often except I know that the rest of them prefer their pasta with sauce – unless it is au nature, with just some olive oil, which is the way the girls love it.

But they eat this without fuss as well, though with a lot of Parmesan cheese grated on top.

When I made it a few days ago the salad looked so pretty, sitting there so full of color, that I just had to take a picture, much to Indira’s amusement.

pastatroutwheatberries 007

Pasta Salad

There is enough here for 6.

Tricolor pasta, preferably the whole wheat kind – 200 gms (dry weight)

one large orange bell pepper, sliced quite fine

3 tomatoes, diced in to chunks

1 can of sweet corn (drained weight 140 grams)

some salad leaves, any kind (green as well as the ones with some  purple as they add so much color)

salt and dried basil to taste

3-4 tablespoons of olive oil and 2-3 tablespoons of lime juice for the dressing

Cook the pasta till it is done. In the meanwhile, assemble all the other ingredients except the salad leaves, season with salt and basil, pour the olive oil and lime juice evenly all over and toss everything well. When the pasta is done, drain and then cool it a little, before mixing it well with the other ingredients. Now add the salad leaves, and toss the salad a couple of times and leave it to rest for a while so that all the flavors mingle.

I love to eat this dish with a little drizzle of chilli-flavored oil and some freshly grated Parmesan.

This salad is a good picnic meal as well, like the wheat berry salad.

2 Comments

Filed under Easy One Pot Cooking, Picnic Food, Quick Meal Ideas, Salads, Versatile Accompaniments

Wheat berry Salad

This salad is excellent picnic food and I make it to take with us sometimes when we go out for the day.  But I do make it quite often otherwise too. Shri likes to take it for lunch so this is what the girls and I had for lunch too, yesterday, with the steamed trout.

pastatroutwheatberries 021

Wheat berry Salad

Wheat berries – 125 gms

Chickpeas – 1 can (drained weight 200 grams)

Sweet corn – 1 can (drained weight 140 grams) or a little more if you like

Frozed or fresh green beans – I do this by approximation; enough for a salad for 6

Tomatoes – 2 large or 3 small, diced (in to chunks not too small)

salt to taste

Pesto – again, approximate as per taste ; use just enough to coat the salad ingredients well, say 4 tablespoons but not too much

(I always leave the pesto out near the cooking surface for a while because most bottled varieties tend to be quite thick to begin with but actually contain a lot of oil, so they become a little more fluid this way, which makes me feel I am able to use less than I would otherwise.  I may be wrong about this but that is what I hope is happening !!)

Snap the frozen beans in to 1 inch or 1 and half inch long pieces and place these in a steaming basket/container. Bring a large quantity of water in a sauce pan to boil, add the wheat berries and cook them till they are soft enough for you. As the wheat berries cook, steam the beans till they are soft (but not so much that they are easily squashed; they will cook well before the wheat berries are done) on top of the same saucepan.

In the meanwhile put all the other ingredients except the salt in a large bowl. When the beans are done, cool them and  add them to the bowl, sprinkle some salt on top and mix everything well.

Drain the wheat berries when they are done, allow them to cool (else I tend to think the heat will soften the tomatoes too much, making the salad kind of mushy) and toss with all the other ingredients.

This is light and delicious, a great salad any time of the year.  Noor and I love it with cherry tomatoes instead of the regular kind. Grated carrots work well too.

Leave a comment

Filed under Picnic Food, Quick Meal Ideas, Salads, Versatile Accompaniments

Potato Salad with Lemon and Chive Vinaigrette

At one point during these summer holidays, I found myself utterly exasperated with cooking the same things again and again. I happened to mentioned this to Jenny and told her that I was in desperate need of recipes that would be quick to cook and suited to the weather in terms of the cooking effort (low) and style (light, non-greasy, not spicy).

At this she was good enough to loan me, among other recipe books, her copy of Delia Smith’s ” Summer Collection”.

That’s where I found the recipe for this salad. When I made it last week  Indira liked enough to say “You should definitely make this again !”

I have made some changes to the original; here is my version.

pics-on-camera 649

Potato Salad

6oo grams of potatoes, cooked in the microwave till they are soft, then peeled and diced (not too small) soon after you take them out

3-4 spring onions, trimmed and chopped small

2 tablespoons of fresh chives, snipped fine with scissors

For the vinaigrette

1 or 2 tablespoons of fresh, chopped mint

3-4 tablespoons of lemon juice

grated zest of one small lemon

3 tablespoons of olive oil

1 teaspoon (or a little more if you like more of this flavor) of grain mustard

1 clove of garlic, grated

rock salt, to taste

freshly milled black pepper, to taste

Combine all the ingredients for the vinaigrette then pour it on to the potatoes while they are still quite warm (the original recipe therefore requires that baby potatoes be used. Cook these with the skin on and add the dressing as soon as the potatoes are done, after draining the cooking water) and mix well.  Add the spring onions and the chives next, and mix the salad again a couple of times.

This is simple and delicious, with lots of subtle flavor.

2 Comments

Filed under Easy One Pot Cooking, Picnic Food, Quick Meal Ideas, Salads, Versatile Accompaniments

A Simple Summer Lunch -Carrot & Green Bell Pepper Pulao with Cucumber Raita

Once again today Noor melted my heart with her  “you make very nice food , Mama” statement.

I love it when they seem to enjoy their meal.

Indira expresses the same feeling when she comes sniffing around the kitchen; she is one for showing her appreciation with her nose.

But it is Noor who often tells me “I love all the food you make ” and sometimes “you are the best cooker ever”.  So just for her I’ll come back to put down the recipes for today’s lunch – vegetable pulao ( a south Indian sort with a spice mix called pitlai powder) and cucumber raita.

Indira seemed to think , while she watched me make the raita, that it was one she didn’t like ( I haven’t made it  since last summer, probably)  but the heat has been so bad this week I thought it was what we needed to eat today.

So it was good to see her polish off two katoras of it and a little more…

Leave a comment

Filed under Easy One Pot Cooking, Picnic Food, Quick Meal Ideas, Raitas, RECIPES

A Summer Lunch- Couscous Salad with Grilled Trout

One might even call this salad tabbouleh, as many cooks and supermarkets do.

However, I made the mistake a long time ago, of ordering tabbouleh for Indira – when she was very little, about 3, and first started to enjoy store-bought “tabbouleh” – at a Greek/Armenian restaurant called Le Varouj in Grasse.  And found that what we got contained more mint/parsley and lime juice and only a very very little amount of grain. I figured then what the restaurant served us was real tabbouleh, as explained in these two links

http://www.myjewishlearning.com/culture/2/Food/Ashkenazic_Cuisine/Israel/Tabbouleh.shtml

http://www.bbc.co.uk/dna/h2g2/A23428587

while what many of us make, which has a greater proportion of grain such as couscous (some people use bulgur), can be correctly termed only a couscous salad.

Noor, especially, loves it, as do I.

In the summer, it is such a pleasure to make.  Even simpler than pasta to prepare, I love  that there’s no stove-top cooking involved here.

It was made in just 15-20 minutes after I woke up one morning a few days ago and wondered what to pack for Shri’s lunch.

The girls and I had this for our lunch that day with some grilled trout on the side.

tabboulehbalchaocactus 007

Couscous Salad

1 cup of  medium grain, whole wheat couscous

3/4 teaspoon of butter

1 orange bell pepper, diced fine

1 small can of  sweet corn, drained thoroughly ( I have been using the no-added-salt, no-added sugar variety for some time now and the corn tastes so much better without the added salt)

1 medium-sized can of chickpeas, drained thoroughly

2 tomatoes, diced

1-2 tablespoons of chopped, fresh basil

1 cup of finely diced cucumber (unpeeled)

3-4 tablespoons of olive oil

1 and 1/4 cups of just-boiled water

Add the butter to the couscous, then cover it with freshly boiled, salted water and leave it (till all the water is soaked) for 5-7 minutes. Fluff it up gently with a fork.

In a large mixing bowl, combine all the other ingredients, season lightly with salt and black pepper (optional, I skip this), then toss with the olive oil.

Now add the couscous to this bowl, and stir everything together and leave it to rest for about an hour before eating, to allow the couscous time to absorb the juices and flavors of all the vegetables .

This is very fresh, very cool, very light.

Leave a comment

Filed under Easy One Pot Cooking, Picnic Food, Quick Meal Ideas, Salads, Versatile Accompaniments

First among equals -Potato and Peas Poha

I should probably create a special category for  the recipes of the things that the girls like  most and are happy to eat as often as I’ll make them, such as varan, upma, grilled salmon with pesto, any fish baked with a provencal marinade (made of oil, sun-dried tomatoes and herbs) etc.

And poha surely would be the first among those equals.

This is another dish that I learned to cook from my mother-in-law.

Indira, especially, loves it like she does nothing else. So today, when I wanted to persuade Indira to come home for lunch (Noor was going to eat with me anyway, because she has a bad cold and I wanted her to stay at home after lunch to have a nap) because I was worried she would not eat well in the school cantine due to an aching tooth and a mouth ulcer, I suggested that I could make poha. She was quick to agree after that !

With a very few modifications – such as the addition of ginger – the recipe that follows is faithful to Ma’s.

It is food that soothes the soul 🙂

noorniceparkpohacrepes-039

Potato and Peas Poha

3 big handfuls of poha, washed under cold running water and left to drain in a colander for about 15-25 minutes

2 large potatoes, peeled and diced very fine (alternatively, you could use potatoes that have been boiled till soft)

2 medium sized onions, chopped very fine

1/2 to 3/4 cup of shelled, frozen peas

a handful of fresh green coriander, chopped fine

1/2 or 1 tsp of grated ginger

salt to taste

3/4 tsp of turmeric powder

1 tsp of mustard seeds

5-6 curry leaves

In a large frying pan, heat 4-5 tablespoons of oil, then add the mustard seeds. When these start to crackle, add the curry leaves and fry these for a few seconds. Now add the potatoes, reduce the heat, cover the pan and cook the potatoes till they are a little more than half done.

Add the onions, and fry with the potatoes till they are very soft and translucent. Now add the grated ginger and peas, and cook for some more time till the peas appear cooked. Add the poha (after sprinkling a little water on it, and salt) and stir everything together. Cover the pan and leave to cook till the poha is quite soft, uncovering the pan periodically (you will need to do this 3-5 times before the poha is soft enough) to sprinkle a little water over the poha and turning it over well so that it cooks evenly.

Stir in the coriander, and eat it while it is still hot.

This is a basic poha, and tastes wonderful with some plain yoghurt and pickle. Different cooks make it and serve it in many other ways, such as adding other vegetables, serving it with a little sev,  lime juice and/or sugar, etc.

4 Comments

Filed under Breakfast Ideas, Easy One Pot Cooking, Picnic Food, Quick Meal Ideas, Starters and Snacks

And we are finally making Crepes!

Indira and Noor have always enjoyed crepes. They like both the sweet sort, filled with Nutella or some confiture, as well as the savory kind (usually made with buckwheat) that we ate last month in Valberg, when we went up to the mountains to do some snow sledding on Noor’s birthday. That day Shri had just the plain – but awesome – buckwheat crepes that come with a generous dollop of beurre de bretagne, and the girls and I had them with a really satisfying topping of ham and some cheese.

Ever since, I have thought that I must try and make crepes at home, since we all enjoy them so much, though so far I have only ever bought the packaged, sweet variety from supermarkets for the girls’ gouter.

First, a little background on crepes. They are very think pancakes, made of a variety of flours, and can be both sweet or savory. Crepes are native to the region of Brittany, in northwestern France, where they are traditionally made with  buckwheat flour and served with cider. The interesting thing about buckwheat is that it is not a variety of wheat; in fact it is not a cereal at all. It is classified as a “pseudocereal” – it is a broadleaf plant and not a grass (true cereals are grasses). Buckwheat – called sarrasin in French – is gluten-free and a rich source of proteins and iron.

And as it has turned out, crepes are just wonderfully easy and quick to make. What’s more, the substitution of whole wheat  for plain flour doesn’t make a discernible difference to the taste. I was quite relieved to see that the girls ate the ones I made today with whole wheat flour with as much enthusiasm as they did the one I made last week with white flour.

Noor and I shared one today with a filling of a little bit of a salmon spread that we both like, instead of Nutella, and that was very nice too. So I am now planning to go the whole hog and make the savory kind one day for dinner, with sarrasin flour.

This recipe, based on the one in Linda Doeser’s “Les 100 Meilleures Recettes – Cuisine Vegetarienne” is, to borrow a phrase from Indira and her friends, easy peasy lemon squeezy 🙂

noorniceparkpohacrepes-049

Whole wheat Crepes

115-120 gms of whole wheat flour, with 1/4 tsp of salt added in (if you have time, sift these two together)

300 ml of milk ( either whole cream or half-fat)

1 egg, lightly beaten

1 teaspoon of sunflower oil

In a mixing bowl, stir in half the milk and the egg in to the flour till the batter is quite smooth. Add the rest of the milk, and the oil, and mix till well combined.

Ideally, leave the batter to rest for 30-60 minutes.

Heat a medium-sized crepe pan till it is very hot. Put a little knob of butter on the pan, and quickly spread it over the surface of the pan with a kitchen towel. Now lift the pan off the heat, pour 1/3 a small cup of batter on to the pan, and quickly bend and turn the pan every which way till the batter covers the entire surface of the pan. Put the pan back on the hob, turn the heat down just a little, and cook till the top of the crepe appears to be dry. Flip it over with a spatula, and cook the other side for 1/2 a minute or so, lifting every few seconds towards the end to check if it is done.

Repeat the process with the rest of the batter. Try not to keep the crepes one on top of the other as they can get difficult to separate.

(Crepes can be cooked in an oven too; more about that another time)

Keep each prepared crepe on a large surface and when it is a little cool, spread any sweet or savory filling over one half, then fold the crepe over twice to form a triangle.

Et voila ! That is all it takes to create a  great snack, or with some salad on the side, a very nice meal.

Read all about crepes here http://www.epicurean.com/articles/crepes.html and here http://en.wikipedia.org/wiki/Cr%C3%AApe

Leave a comment

Filed under Baked Main Meal Dishes, Breakfast Ideas, Picnic Food, Quick Meal Ideas, Starters and Snacks

Moong Sprouts Chaat

Our lunch today started as a little holiday experiment.

The girls have done some planting in school on more than one occasion, but it isn’t something I have done with them at home.

But there is this book Indira has which she likes to read with me, called “Flowers and Trees” which discusses things like “Do plants eat?”, “Why do we pull out weeds?” , the basics of pollination and so on. So one night a few days ago while we  were reading that book again I suggested that we could try and sprout mung beans, to see how things grow.

The girls literally jumped at the idea, since this offered an opportunity to get out of bed and delay lights-off time.

So we soaked 1 cup of whole, green moong that night in a lot of water. The next morning I drained the water, put the beans in a large, thin tea towel, tied it up in to a bundle, and put it inside the oven, since the idea, I thought, is to keep the beans in a dark place.

[The process I followed this time is the one I remember my father-in-law used to sprout moong once when I was visiting. But then I came across this site today-http://www.sproutpeople.com/grow/sprouting.html – which recommends that seeds need to be allowed to breathe; so I am going to try making sprouts again by leaving the beans in an open but cool area. Another site I also found today which offers a simple guide to sprouting is http://www.wisebread.com/scrumptious-sprouting-for-your-meals ]

It was Monday night when we soaked the beans. And today, Thursday, is  when we finally had chaat, for lunch, that we made with the sprouted beans, using the recipe I got on the phone this morning from my mother. The girls have quite enjoyed opening the bundle every night these past 3 days, to check if the beans were sprouting as expected, helping me sprinkle water on the cloth and then retying the bundle before putting it back in to the oven.

The chaat itself has been a reasonable success. Noor says she likes it; Indira says she loves it.  But I suspect that might be more because she feels this is their project, so to say. She hung around with me in the kitchen this morning, watching with great interest while I prepared the other ingredients for the chaat, and kept a keen eye on things in general (she pointed out that the beans might start sticking to the bottom of the pan soon, when she saw me forgetting to stir them as they cooked because I was talking to a friend on the phone at the same time).

Either way, I am glad they have taken to something that is so nutritious and low-fat.

bhurjiandchaat-011

Moong Sprouts Chaat

Sprouted beans (grown with 1 cup of dry mung beans)

2 medium sized potatoes, boiled, peeled and diced in to small pieces

a 3 or 4 inch long chunk of cucumber, peeled and chopped fine

2 firm, small tomatoes, diced in to small pieces

1 large onion or 2 small onions, peeled and chopped fine

salt, chaat masala powder, red chilli powder (I use the Kashmiri kind, in deference to the girls’ taste buds) and lime juice to taste

2 green chillies (optional), chopped fine

2 tbsp of sunflower oil

1 tsp of cumin seeds

1 tsp of grated ginger

some green coriander, chopped fine

In a frying pan, heat the oil and fry the jeera seeds for a few seconds till their aroma is released. Add the ginger and saute for a few seconds. Then put the beans in and fry them in the oil for  for a few minutes without covering the pan. Then add some  water (about 1 cup or a little more ), cover the pan and cook the beans on low heat till they are quite soft ( they could be cooked in a pressure-cooker too, using a lot less water).

In a large mixing or salad bowl, combine the rest of the ingredients, then add the cooked beans after they have cooled and toss everything together well.

This was a great change from the usual salad/pasta/parantha-subzi kind of lunch. The girls really enjoyed it with plain yoghurt and some buttered toast on the side. I guess one could use the chaat to make a kind of roll or wrap, with phulkas or tortillas, too.

I believe there are endless variations to this basic chaat theme ; one could mix different chutneys, yoghurt, and add other ingredients and spices to the sprouts,  and the sprouts themselves could be of any of a variety of beans.

And I seem to remember a delicious  dahi-puri I have eaten in restaurants in Mumbai which involves filling a mung sprouts-based mix in to golgappas.

I am looking forward to trying my hand at that one in particular !

Leave a comment

Filed under Breakfast Ideas, Picnic Food, Quick Meal Ideas, Salads, Starters and Snacks, Versatile Accompaniments

Tomato,Mozzarella(or avocado), and Pesto Sandwich

There is a wonderful Mediterranean salad, which brings together tomatoes, mozzarella, and either fresh basil or pesto. The result is an incredibly fresh and flavorful dish.

Sandwiches and paninis that combine these ingredients are common in boulangeries here, and I often make variations of that theme.

This is the sandwich that Shri feels he could eat every day for lunch.  Noor loves it too, and I make a much smaller version of it for her sometimes.

Indira doesn’t like the taste of mozzarella – unless it comes to her all melted on top of a pizza or inside the Aubergine Parmigianna in which case she loves it – so she likes me to skip that bit when I make this sandwich for her, though she loves avocado in it.  But I think the combination of mozzarella and pesto is what makes it so special for the rest of us.

pestosalmonandsandwich-015

Tomato,Mozzarella, and Pesto Sandwich

Half of a multi-grain baguette , or olive bread

1/2 of a medium sized tomato, cut in to thin slices

1/4 or 1/8 of an avocado (optional), thinly sliced

50 gms of mozzarella(drained weight), cut in to thin slices

some salad leaves

2 tsp of pesto

Slit the baguette along the length on one side, without cutting through the other side.  Sprinkle a tiny amount of olive oil on both surfaces.

Layer the leaves over the lower half, then follow that with the tomato slices, the cheese slices and the avocado slices. Spread the pesto next, then close the sandwich and wrap tightly in cling film.

Ideally, make this an hour before eating, and all the flavors will come together beautifully.

One could season the filling with some salt, but I tend to think that there are so many lovely flavors here, one would surely not miss the salt; so I skip it.

This sandwich is especially nice if made with olive bread.

Leave a comment

Filed under Picnic Food, Quick Meal Ideas, Starters and Snacks, Versatile Accompaniments

Dhokla – A very quick recipe

I have never been able to make good idlis, and so  had never tried to make dhokla either, since typically that would use the same technique of steaming, which I never had much success with.

Until, that is, my friend Pooja gave me this recipe a couple of weeks ago for making dhokla in the microwave. The preparation time is only about 5 minutes, and the cooking time is only about that as well.

The results were good enough that I have made dhokla more than once since and the girls have really taken to it which is great.

Dhokla

Besan (chickpea flour) 1 cup ( or a mixture of besan and suji i.e. semolina in equal or varying proportions)

125 ml of whisked yogurt

some (about 1/4 cup) water

3/4 tsp of grated ginger

1/2 tsp of turmeric powder

2  tbsp of sunflower oil

lemon juice – 1 tbsp

Eno fruit salt – 1 tsp

salt to taste

1/2 tsp of mustard seeds and 4-5 curry leaves (chopped) for tempering

1  tbsp grated (fresh or desiccated) coconut and 2 tsp of chopped green coriander for garnish

Mix the yogurt, the water, the salt, the ginger , the oil and the turmeric powder in to the besan till the batter has a smooth consistency that is easy to pour(but not too runny). Stir in the fruit salt at the end, and pour the mixture immediately in to a microwave bowl after oiling its sides lightly.

Cover the bowl with an airtight lid and cook the mixture for about 4-5 minutes (at about an 800 W setting).  Check, by inserting a knife in the middle if the dhokla is done else cook for another minute. Leave the bowl in the microwave for half a minute before taking it out.

In a small pan, heat a tbsp of oil, then add the mustard seeds and the curry leaves and fry till the mustard seeds crackle. Pour this mixture over the dhokla, spread the coconut and coriander evenly,  then cut the dhokla after a few minutes in to pieces as big or small as you like.

With some coriander chutney, this is just a delicious treat.

Thank you, Pooja !!


Leave a comment

Filed under Breakfast Ideas, Easy One Pot Cooking, Picnic Food, Quick Meal Ideas, Starters and Snacks, Versatile Accompaniments

Orange Cake

This afternoon, we had three of Indira’s and Noor’s friends/schoolmates come over for a play date.  I had planned to get some pain au chocolat for the girls’gouter, to go along with compote/fruit yoghurt/fruit.  But when I went to the local boulangerie I found that they had run out of pain au chocolat as well as croissants, the other French bakery classic that most children love.

So I decided that I’d bake an orange cake, instead.

I have been wanting to make one anyway, ever since I ate some a couple of weekends ago at the birthday party to which I took the crispy peanuts. One of the other guests had brought delicious orange cake, and I really like it because it was just full of lovely flavor.

I did get the recipe from the gentleman who had baked it, but when I went through it again today I realized that it uses rather a lot of butter -300 gms for a 4 egg cake, plus more for a glaze. So I started looking around for another recipe that might promise the same taste – after all, I reasoned, in an orange cake the dominant flavor would come from the juice and the zest of the fruit – without using quite so much fat.

And I was very pleased to find one such recipe sitting on a shelf in in my own kitchen- in Ms. Jean Pare’s excellent collection titled “Muffins and More” .

This recipe below- a slight variation on the original – uses a lot less butter but the cake tastes as nice, IMO.

dscn0009

Orange Cake

For the cake:

2 eggs

1/2 cup (75 gms) of unsalted butter, melted

1 cup of sugar

2 cups of all purpose flour

1/2 tsp of salt

2 tsp of baking powder

Zest from one orange

Juice from one orange (plus a little water, if required, to make the specified quantity) 1/2 cup

For the glaze:

Juice from one orange

1/4 cup sugar

In a bowl, mix the flour, salt and baking powder.

Whisk the eggs in a large mixing bowl. Now blend in the sugar and the butter. Stir the zest and the juice in, then gradually fold in the flour mixture taking care that no lumps form. Pour this mixture in to a non-stick baking tin, and bake at 180degreesC for 45-60 minutes.

In a small saucepan, prepare the glaze by mixing the sugar and the juice and heating until the sugar has dissolved completely. Pour the glaze over the cake as soon as you take it out from the oven, and then leave the cake to cool for about 20 minutes before taking it out gently from the tin.

Noor, Alicia, and Celine loved it and the older girls in fact asked for and finished a second piece each. Indira didn’t like it too much (though she says she really likes the crust with the glaze), and nor did Alicia’s little sister Flora.

This cake makes a great little snack with a cup of tea; it is not very heavy on the stomach, and has a wonderful flavor (which owes a lot to the glaze so don’t skip that bit).

Leave a comment

Filed under Cakes and Muffins, Picnic Food, Starters and Snacks

Carrot Muffins

Just before dinner tonight, Indira said “Mama, what can I take for gouter tomorrow?”

Tomorrow being Tuesday, they will be going swimming again from school , and I know she enjoys having a special gouter to eat on the bus coming back, rather than the usual clementine or apple slices.  So I suggested that I could make some carrot cake, since this is a current favorite with her.

She was quite pleased with the idea, but requested that I make muffins, instead of a cake, so that is what I did.

The recipe is the same as for the carrot cake that I wrote about recently, except that I put the mixture in to muffin trays, and the total baking time was around 15 minutes shorter than it would have been for the cake.

I don’t know what it is about muffins – but I do believe the ones I have made tonight taste nicer than the cake I made the last time with the same recipe (I have been eating the bits stuck to the muffin tray)

Two small changes that I made – I skipped the vanilla essence this time; and I used a wheat flour available here that is called “semi-complet” ; it is sort of halfway between the whole wheat and refined kind. it makes the muffins more prone to breaking if not handled carefully when you are taking them out of the tray-though they hold just fine after that- but I don’t like the idea of using refined flour too much because it is “empty” calories, as they say.

With half the quantities as in the recipe for the cake, I was able to make 12 muffins.

And now, I will need to try and resist a midnight snack !

Leave a comment

Filed under Breakfast Ideas, Cakes and Muffins, Picnic Food, Starters and Snacks

Crispy Peanuts

Some days ago, I asked my mother for ideas for a starter, to serve to guests we had invited to dinner last weekend.

She suggested these peanuts, that are coated in chick pea flour and then fried. As she described how to make them, the memory of having eaten them, long ago when I still lived at home, gradually came back and I remembered that they have a great crispy texture.

I therefore did go along with her suggestion and make them, and was glad I did. Our friends really liked the taste (I gathered from Naveen that this is a Rajasthani recipe and this may explain how my mother knows it since that is where she grew up), as did all the children, especially Noor, and Sarita and Naveen’s two and a half year old Kriti.

The thing I really loved about them is how quick they are to cook !

Crispy Peanuts

200 gms of unsalted and grilled or plain peanuts, without the skin

1 small cup – 175 ml measure –  of besan (chickpea flour), though you may find you need a little more

1/2 tsp of turmeric

1/2-1 tsp of kashmiri or other chilli powder (adjust according to your taste)

1 tsp of coriander powder

1 tsp of amchur (dry mango powder)- optional

salt to taste

750 ml sunflower oil, to deep fry

Put the oil in a wok/karhai and leave it to heat till it is of a temperature high enough to deep fry without letting it reach smoking point.

In the meanwhile mix the salt and all the spices in to the besan, and rub it through your fingers for a minute to make sure that there are no lumps. Put the peanuts in a bowl, and wash them under running water, draining out any excess. Now add the besan in to this bowl, and coat it well on the peanuts, adding a little bit of water if required but don’t let the besan become at all pasty or runny – it should have the texture and feel of sticky dough.

Take the peanuts in to your hand about 1-2tbsp at a time, and drop them gradually in to the oil, trying to separate them as you go. Now wait till they start to rise to the surface of the oil and then with a slotted frying spoon gently try and separate the peanuts as much as you can by gently pushing at the little clumps that will have formed.

Turn the peanuts over a couple of times and take them out as they start to look crisp while still retaining a yellowish rather than a brown color, and drain the excess oil on absorbent paper. Take care not to let the peanuts brown too much or they – and the besan – will acquire a bitter kind of taste.

These peanuts won’t seem very crisp at first, right after you take them out, but they get a lot crispier after a while, so leave them to cool and then store in an airtight box after they have cooled and acquired the right bite. You can try to separate them some more once they have cooled.

My mother suggests serving these with a sprinkling of chaat masala; I forgot that part on Saturday but everyone enjoyed them anyway.

As a postscript, I would like to add that I made them again yesterday, a much larger quantity this time (500 grams of peanuts). This was for the birthday party of a friend’s daughter this afternoon. And it was gratifying to see them go pretty quick this time too !

Leave a comment

Filed under Picnic Food, Starters and Snacks

Jenny’s Famous Carrot Cake

Kate – Uma’s mom- captioned her e-mail quite aptly when she sent me the recipe for this carrot cake that Indira so loves.

I first heard about it when Jenny baked it for school some months ago (her granddaughter Dylan was in Indira and Uma’s class till she moved away recently).

Then Kate made it too, a few weeks ago, and Indira told me again how much she liked it, after Uma shared some with her on the bus coming back to school from their weekly swimming trip.

So yesterday she was really thrilled when I told her she could help me bake it for their gouter.

Noor, let it be noted, pitched in too, fetching and clearing things, stirring the mix a bit, and was delighted to be allowed to use the the new electric whisk.

Jenny’s Famous Carrot Cake

4 eggs

2 cups of flour (I use a mix of whole wheat and plain white flour)

1 cup of melted butter or cooking oil

2 cups of sugar

3 cups of grated carrot

1 tsp each of baking soda,baking powder,cinnamon and salt, mixed in to the flour

1/2 tsp of vanilla essence (optional; I added it, though the original recipe does not mention it)

For the icing:

75g cream cheese, 50 g butter,1 tsp of vanilla essence and icing sugar(to taste), all well-blended

To make the cake:

Whisk the eggs in a mixing bowl, then add the sugar and the butter, and blend well. Now add the carrots, stir just to blend, then add the flour mixture. Mix this in well, and pour in to a cake tin (use one tin if you are not going to ice the cake, or two equal-sized round tins if you do intend to make the icing too) and bake for 45 minutes-1 hour at 175 degrees C.

To ice the cake, layer the two rounds with it, and also put some on the top.

I have it on good authority that the icing is delicious, so you may want to try and make that extra effort.

I skipped this part but Indira said “Oh but it’s exactly the same !!!” anyway, thank goodness 🙂

Leave a comment

Filed under Cakes and Muffins, Picnic Food, Starters and Snacks

Date Cake

Loaded with soft dates, this cake has a special, really delectable taste.

I almost did not buy the creme anglaise to go with it, when I decided to make it for dessert last Saturday, but then I was glad I did because everyone seemed to enjoy the combination !

Date Cake

1 egg

1 and ¼ cups of chopped dates

½ cup of chopped walnuts (optional but a nice touch)

¾ cup of brown sugar

¼ cup of melted butter

1 and a ½ cups of any flour (refined is probably ideal, though I often bake with even whole wheat flour)

1 and a 1/2 tsp of vanilla essence

½ tsp of salt

1 tsp of baking soda

1 tsp of baking powder

Soak the dates in 1 cup of boiling hot water, after adding the baking soda and leave them aside to cool. In the meanwhile, beat together the egg and the sugar in a large mixing bowl. Add the vanilla to this mixture.

In another bowl, combine the flour, the salt, and the nuts.

Add the dates once they have cooled to the first mixture, then add in the flour mixture.

Now stir in the melted butter and combine well.

Put this cake batter in to a cake mould, and leave it to stand for 15-20 minutes.

Then bake in a preheated oven at 180degreesC for 1 hour, or till a table knife inserted in to the middle comes out clean and dry.

Like the chocolate and date loaf, this cake makes for quite a fancy dessert, eaten with crème anglaise or vanilla ice cream 🙂

4 Comments

Filed under Cakes and Muffins, Desserts, Picnic Food, Starters and Snacks

Spanish Omelette(Tortilla)

All this last week, I have had a solitary red bell pepper sitting among the other vegetables in the fridge and  looking at me -I felt -reproachfully for being left unused.

I usually love red bell pepper in salads, but I haven’t felt like making salad since the weather has turned cold. So I decided this evening to make a Spanish omelette instead, since red pepper makes a healthy, tasty,colorful addition to it. I will use some of it for lunch tomorrow for Noor and me – it is a food she loves. This omelette, called a tortilla in Spain, luckily keeps well for a few days in the fridge, so the rest of it will be handy for dinner for the 4 of us one evening later this week.

You could add meats (such as diced ham) and vegetables to the basic egg and potato combination, to make different kinds of tortilla. Here’s the recipe for my version of it.

Spanish Omelette

6 medium sized potatoes, peeled and cut across in to very fine round slices( I use a food processor to do this; I’d find it a challenge to slice the potatoes as fine by hand)

6 eggs

1 large red bell pepper, cored and diced

2 medium sized onions, peeled and sliced fine

4 tablespoons of olive oil

Heat 3 tbsp of the olive oil very slightly in a large, fairly thick-bottomed frying pan. Add the onions and the potatoes, cover, and leave to cook till the potatoes are soft, over moderate heat. Turn the mixture gently from time to time with a flat/wide cooking spoon, taking care that the onions and the potatoes don’t brown or burn. Try to separate the fine slices of the potatoes – which tend to stick to each other because they are so thin – each time, so that all of it gets cooked. Half way through, add the pepper.

When the mixture is cooked (the potatoes should be soft but not lose all form and become mushy, though they will be smashed up a bit), take it out in to a large dish, and allow it to cool.

Break the eggs in a separate bowl, and season with salt and pepper. Add to the first mixture when it has cooled and stir gently to mix evenly.

Return the frying pan to the heat. Add 1 tablespoon of olive oil, turn the egg and potato mixture back in, cover, and leave it to set, on moderate heat. When the mixture is almost set (this will take about 10 minutes;the middle won’t yet be set but don’t wait for this to happen else the other side will get burnt), turn the omelette over by sliding it on to a large plate, and then leave the other side to set. This will take just a few minutes.

Take it out when it is cooked on to a large serving plate and when it has cooled down, wrap it in cling film to store in the fridge.

This omelette makes a complete meal, with a green salad or soup, and some bread. And since it is easy to carry, sliced up, it is a great picnic food as well. I also make it sometimes for an indulgent, leisurely sort of weekend breakfast.

I am looking forward to my delicious lunch tomorrow, already 🙂

Leave a comment

Filed under Breakfast Ideas, Easy One Pot Cooking, Picnic Food, Starters and Snacks

Carrot Cake

A few days ago Uma, one of Indira’s classmates, brought carrot cake to school for her snack and she shared some with Indira, who loved it and has asked me several times since then to try and make one.

So this afternoon, I decided to try out a recipe I have for carrot cake (from Jean Pare’s fantastic “Muffins and More”) and this is what the girls had for their gouter today, with a glass of milk. Noor liked it a lot, and asked for and finished a second piece. Indira, though, said she preferred the one that Uma’s mom made. Oh well…

I liked it a lot too; it just bursts with flavor and taste, thanks to the carrot and the spices.

Noor stayed home this afternoon for her nap instead of going back to school after lunch, and helped a lot with fetching and putting the ingredients together, breaking the eggs, mixing the batter, etc.

Well done, Noor, and thank you !!

Carrot Cake

This recipe has a few changes from the original, but still works well.

2 eggs

1/2 cup of melted butter (a cup of 200 ml measure)

1 and 3/4 cups of flour

1 cup of brown sugar

1 cup of finely grated carrots (you will need 3-4 carrots for this quantity)

2 and a 1/2 tsps of baking powder

1 tsp of cinnamon

1/2 tsp of freshly grated/powdered nutmeg

1/4 tsp of freshly powdered cloves

1/4 tsp of ginger powder

walnuts – 1/4 or 1/2 cup

Blend together the sugar, the eggs and the butter. Stir in the carrots.

Mix all the other ingredients in a bowl. Add to the previous mixture, and gently stir together till everything is well-blended.

Pour in to a loaf pan and bake for 50-60 minutes at 180 degrees C.

Remove the cake from the pan only after it has cooled down, to keep it from breaking.

This is definitely one to make again.

Leave a comment

Filed under Cakes and Muffins, Picnic Food, Starters and Snacks

Potato and Feta cheese cakes

I made soup for dinner two days ago and fortunately there is enough left for another meal for the four of us. So tonight, I am going to make only these potato and feta patties/cakes, to go with the soup. We’ll pick up some nice walnut bread from the boulangerie when we walk back from school, and that will round off the meal nicely.

The good thing about this recipe is that the mixture keeps well for at least a day, in the fridge, so if there is some left over, I can make a few patties for the girls’ gouter for tomorrow evening.

Potato and Feta cheese cakes

500 gms potatoes

100 gms feta cheese, drained

1 egg, lightly mixed in a small bowl to combine the white portion and the yolk

2 tsp of thyme ( I use the bottled kind)

1 tbsp of lime juice

2 small onions, chopped very fine

salt and black pepper to taste

all-purpose flour

sunflower oil (enough to shallow-fry the patties)

Cook the potatoes in the microwave( I prefer to do it this way rather than pressure cooking because the latter method leaves the potatoes with some water inside, making the final mix prone to sogginess)  till they are soft.

When they have cooled, peel and then mash them in a large mixing bowl. Now mix in the feta cheese (well-crumbled), the onions, the egg, the salt, the pepper, the thyme, and the lime juice.

Mix everything thoroughly, cover the bowl with cling film, and leave it in the fridge for an hour or two.

To make the patties, divide the mixture in to equal sized balls, flatten them between your palms in to 1cm high discs. Coat each lightly in all-purpose flour , then fry them in moderately hot oil in a skillet/shallow frying pan till they are nicely browned and crisp on both sides.

These patties need gentle handling because the cheese makes them quite soft and therefore prone to crumbling.

The original recipe, which I found in a cookbook for vegetarian food from different parts of the world (it is written in French and that has been great for expanding my vocabulary of French culinary terms), calls for fresh thyme and spring onions. But since I never seem to have those two ingredients at hand, I invariably end up using bottled thyme and regular onions, and the patties taste great anyway. The girls just adore them – they don’t seem to care that they contain feta, a cheese that they wouldn’t go near in it’s original form!

Leave a comment

Filed under Picnic Food, Starters and Snacks, Versatile Accompaniments

A quick lunch for two – Salmon Salad

It was just Noor and me at home yesterday for lunch. She loves baguette and we had picked up one from the boulangerie when we walked back home from school just before noon.

So I decided that I’d make some salad for lunch, to eat with the baguette, with fruit yoghurt to serve as dessert.

Luckily I had cherry tomatoes in the fridge, and canned salmon and sweetcorn in the kitchen cupboard. Noor LOVES each of those things, so I knew she’d approve of the salad, even though I was planning to sneak in some green beans. This is how I made it.

Salmon Salad

(serves 3-4)

1 150g can of salmon, packed in water

1 150g can of sweetcorn

100-150 g of fresh/frozen green beans, cut/snapped into1 inch pieces

150-200g cherry tomatoes

1 or 1 and a 1/2 tsp dried basil

2-3 tbsp olive oil

2 tbsp of lime juice (add more, or less, if you like)

Cut the tomatoes in to halves and put in a salad bowl. Sprinkle the basil on top and add the olive oil.

Mix these 3 ingredients together gently and leave for some time, say 30 minutes (this is the key to making a really tasty salad if you are using tomatoes and olive oil. The flavors of these two things mingle to produce the most divine taste there is, and you really have to give it time for it to develop).

In the meanwhile, steam the green beans and allow them to cool. Drain the salmon and break up the meat with a fork. Now add the beans, the corn, and the salmon to the tomatoes, season with sea salt, add the lime juice, and toss everything together.

Serve roasted potatoes on the side, for a more filling meal.

Bon appetit !

Leave a comment

Filed under Picnic Food, Quick Meal Ideas, Salads

Their favorite Cake – Chocolate and Date Loaf

As I put together the ingredients, earlier today, for the cake that I took as dessert to the home of friends that we ate with this evening, I realized that this is the third time this month that I am baking the same cake. I made it for Indira’s birthday when we invited all our family friends to a picnic, and it is the one that I sent to school too, for her class.

But this is the cake that she and Noor love best, of all the various recipes I have tried over the years.

This recipe makes a large-ish cake (12- 16 quite big pieces) so tonight it was very gratifying to see it go quite quickly though we were only 5 adults, Indira, Noor, and our hosts’ 14 year old son 🙂

Chocolate and Date Loaf:

2 eggs

3/4 cup melted butter ( I use a cup that is a 200 ml measure)

1 cup sugar

2 cups of wheat (whole or refined) flour

1/2 cup of cocoa

1/2 cup of semi-sweet chocolate chips

1/2 tsp of salt

1/2 tsp of baking soda

1 cup of soft dates,finely chopped

1 cup of boiling water

1 tsp of baking soda

1 and a 1/2 tsp of vanilla essence

Combine the last 4 ingredients in a bowl and set aside to cool.

Best the first three ingredients in a large mixing bowl.

Mix the remaining ingredients in another bowl.

Add the date mixture after it has cooled down to the eggs,butter and sugar mixture. Now stir in the rest of the ingredients, and pour in to a cake tin (if it is not the non-stick variety then of course the tin will need a light coat of melted butter and then a sprinkling of flour over that).

Bake at 180 degrees C for 50-60 minutes till a knitting needle/table knife comes out clean.

This cake goes really well with some creme anglaise or vanilla ice cream served on the side . It makes quite a fancy dessert at parties 🙂

6 Comments

Filed under Cakes and Muffins, Desserts, Picnic Food, Starters and Snacks

Pasta Salad with Pesto-Easy Dinner for a Summer Evening

It has been so hot this year – or may be I forget from one July to the next how bad it can get – that my usual enthusiasm/willingness to cook has deserted me more often these past few weeks than I can remember it happening before.

But the family has to be fed; so I decided one evening recently to combine everyone favorite ingredients – that’s cherry tomatoes for Noor and me, corn for Indira and Noor and Shri, pasta and pesto for everyone(most of all Indira) -plus some beans and grated carrots for the nutrition quotient, to make this pasta salad. Now that sure was a very quick and easy dinner ! Here’s what I did :

Pasta with Vegetables and Pesto

Pasta (any short shape) – 150 grams

Carrots – 3 medium sized

Frozen beans – 3/4 cup

Sweet Corn – a 125 gram tin

Cherry tomatoes – 150 – 200 grams

3 tablespoons of readymade pesto sauce

(look for brands that make the pesto with pine nuts, and not cashewnuts, which is the more commonly used ingredient in most commercially available pesto)

Snap the frozen beans in to 1 inch pieces and steam them till they are cooked.

(One way to do this is to place the steamer, with the beans in it,over the pan in which you will boil the pasta, so that both get done at the same time)

Boil 1-1.5 litres of water in a kettle, then transfer to a large pan. Add 1/2 tsp salt and a few drops of any cooking oil, and bring it to a boil again. Add the pasta and leave it to cook, stirring it occasionally.

In the meanwhile chop the cherry tomatoes in to halves and put these in a large salad bowl.

Add the corn to the tomatoes, after draining all the liquid in which it was packed.

Peel,wash, and grate the carrots in a food processor, then add these as well to the corn and the tomatoes.

Once the beans are steamed, leave them to cool for a bit, then mix with the other vegetables along with a sprinkling of salt and the pesto.

Once the pasta is cooked, allow it to cool for a few minutes (pasta that is too hot would make the tomatoes go a little soft) then toss it will the other ingredients in the bowl.

This salad works equally well with a different dressing. Combine 3 tablespoons of olive oil, 3 tablespoons of lemon juice, and 1/2 a teaspoon of dried basil. Mix this dressing in to the vegetables instead of the pesto.

It is a good idea to make this salad at least an hour before you are ready to eat, since this allows the pasta to soak in all the flavors.

Leave a comment

Filed under Picnic Food, Quick Meal Ideas, Salads

Summer Special – Roasted Bell Peppers in Olive Oil

Now that summer is here, and those gorgeous orange and yellow bell peppers are available in abundance and at decent prices, I am enjoying one of my favorite summer dishes – roasted bell peppers soaked in olive oil.

Cooked like this, these peppers keep for up to two weeks in the fridge. And they are really versatile – they make a delicious and pretty addition to a summer picnic, or buffet; you can add them to a pasta salad; or use them inside some nice olive or walnut bread, or even just plain baguette, in combination with salad leaves for a really delicious, light sandwich.

They are wonderfully easy and quick to make, too.

Roasted Bell Peppers in Olive Oil

(there’ll be enough here to serve as a starter for 6-8 people)

3-4 bell peppers (red, orange and yellow)

6-8 tablespoons of olive oil

1 clove of garlic

Wash and dry the peppers, then cut each in to quarters lengthwise. Remove the core from each piece.

Pre-heat the oven, at 220°C, for 5 minutes. Line the baking tray of your oven with aluminum foil or cooking paper and place the quartered peppers on it with the skin side up. Roast the peppers for about 15-20 minutes, or till most of the skin of each piece blisters. In the meanwhile, grate the garlic in to the oil.

Let the pieces cool on the tray and then peel off the skin. Slice each quarter in to half lengthwise, place all the pieces in a wide plate, and pour the olive oil on them. Cover the plate with cling film, and leave the peppers in the fridge if you are not going to use them the same day.

If you are, then do finish preparing the dish at least a couple of hours before the meal, so that all the flavors get time to mingle.

You could skip adding the garlic to the olive oil, if you don’t like that flavor.

Enjoy, and thank the Italians for this simple but fabulous taste 🙂

Leave a comment

Filed under Picnic Food, Starters and Snacks, Versatile Accompaniments

Remembering Biji – Gajar ka Halwa

I started this blog by talking about the shakkarparas and gajar ka halwa I made for Diwali last year.

So I am back to write about the halwa, a dessert that Indira and her father just love.

Though it is in my mother’s kitchen that I first learned to make it myself, I still remember watching my Biji (my maternal grandmother) cook this halwa on her chulha in my grandparents house in a village in Rajasthan, stirring in the cream – or ghee- that gives it that special taste. It was a special treat when we visited her during our winter holidays from school, and a couple of times  we even carried some back all the way from Rajasthan to Bihar, in a big steel box, for our father who loved it as much as we did.

And back in those days, since there were no microwaves, she would – as does my mother to this day -add a little more ghee to keep the halwa from sticking to the pan every time she re-heated the leftover portion, which enhanced the taste a little more each time…

My brother likes to tell my mother  that though she is a good cook, her gajar ka halwa is not in the same league as Biji’s.

Maybe it is the love and effort they put in to it, or it might well really be because of the copious amounts of cream and ghee; either way, I do agree with my brother that their gajar ka halwa is the best in the world.

Here’s my recipe, based on theirs:

Gajar ka Halwa

500 gms carrots

500-600 ml full cream Milk

4 tbsp ghee

10 almonds, skinned and halved

2 tbsp raisins

¾ cup sugar (a 200ml measuring cup)

5 green cardamom pods

a few small strips of beaten silver leaves

Peel, wash and grate the carrots in a food processor. Bring the milk to a boil in a heavy-bottomed pan. Add the carrots, stir the mixture and leave to cook on medium heat, stirring quite frequently until the carrots are very soft and the milk almost completely dries up.

In the meanwhile, after adding the carrots to the milk, soak the almonds in hot water for about 20 minutes, then remove their skins  and halve them. Soak the raisins as well, in half a cup of hot water, then drain the water after 15-20 minutes. Powder the seeds from the cardamom pods.

Once the milk in the pan has almost dried up, add the sugar and cook again until the milk dries up completely. Now add the ghee and cook the halwa for another 7-8 minutes. To finish, stir in the raisins, the almonds and the cardamom powder and after transferring to a serving bowl, layer the silver strips on top.

You could also add a few teaspoons of khoya or dessicated coconut towards the end of the cooking process.

This is just a great dessert on a winter evening.

1 Comment

Filed under Desserts, Picnic Food

Carrot Koshimbir

Not just the four of us, but most everyone who has ever tasted this salad loves it.

I first found this recipe 8 years ago, when I invested in a book that has since become my cooking bible -Kaumudi Marathe’s “A Family Treasury”, a great collection on Maharashtrian cuisine.

My mother-in-law was a Maharashtrian, so my husband has grown up on varan, puran poli and salads such as the one I am going to write about today.

I didn’t get to spend a lot of time with Ma after I got married, though I did learn to make poha, puran poli, and varan her way. But since then, I have learned to cook many of my husband’s other favorite foods chiefly from this book. Thank you, Ms. Marathe !!

As to the salad – it is the form in which my kids like carrots best. And I have to agree with them, it is the nicest way I have ever eaten this vegetable too, barring my own mother’s-and grandmother’s- gajar ka halwa.

Carrot Salad

4 large carrots

3 tbsp fresh grated (or dessicated) coconut

3 tbsp ground peanuts(the koot I have mentioned earlier)

2 tsp sunflower oil

a pinch of turmeric, a pinch of asofetida

1/2 tsp mustard seeds

1/2 tsp cumin seeds

4-5 curry leaves

salt, sugar, and lime juice- to taste

1-2 tbsp fresh, chopped coriander leaves

Method:

Peel, wash and grate the carrots. Heat the oil in a small pan, then add the mustard seeds and wait till they pop. Move the pan off the fire (this keeps the ingredients that you will be adding next from getting burnt) and quickly add the asofetida, turmeric,cumin seeds and curry leaves. Stir them for a few seconds then pour this tempering over the carrots. Now add the coconut and peanuts, the salt, sugar, lime juice, and coriander, and toss everything well before serving.

If you want to make this a few hours ahead, then add the tempering to the carrots earlier but mix in the rest of the ingredients just before serving, otherwise the salad can become somewhat soggy, sometimes.

Also, while you can use dessicated coconut to save time, use freshly grated coconut if you can – this takes the taste to another level 🙂

4 Comments

Filed under Picnic Food, Salads

Noor’s Favorite Tilwale Aloo

Having just documented one of Indira’s favored foods, I feel this urge to be fair and record one of my younger baccha Noor’s favorites too, before I log off for the day.

Actually, we owe their Nanda Mami a big thank you for introducing us to this amazingly simple, but delicious food when she stayed with us for a few days 3 years ago.

It is very versatile, too.  I make this for us to eat with leftover-daal paranthas and raita, or sometimes as part of a first course, to go with a very french salad, when dinner is a more formal affair with guests at home.

And since I am always looking for ways to up the nutrition quotient- the til (sesame) delivers in that department.

A real winner in every way, then !

Tilwale Aloo

500 gms of baby potatoes

2-3 tbsp of sesame seeds

(I tend to add more as I love the crunchy taste)

1/2 tsp of mustard seeds

1/2 tsp of cumin seeds

1/4 -1/3 tsp of turmeric powder

salt to taste

Juice of half a lemon

3 tbsp of sunflower oil

Boil and peel the potatoes. You can try and save time by by trying to find the pre-boiled,peeled baby potatoes available in some places.

In a frying pan, heat the oil (don’t wait till it starts to smoke, though) and add the mustard seeds. When they start to splutter, add the cumin seeds and as soon as these turns a darker brown (which releases their aroma) add the sesame seeds. Do take care not to let the cumin go black – IMO this neither looks nor tastes good .

Stir the sesame seeds periodically till they start to go a light brown, then add the turmeric, the potatoes, the salt, and toss everything together once. Remember not to let the sesame go too brown. This can make the taste almost bitter. Continue to turn the potatoes from time to time, over the next 5-7 minutes. Now add the lemon juice and cook the potatoes in this juice for another 5-7 minutes, till they liquid is all absorbed.

Take off the heat, and toss in some fresh, chopped coriander if you like.

This dish tastes best if it is prepared a couple of hours ahead of the meal, because this allows time for the ptatoes to really absorb the flavors.

Another thing – I find it works better to have squeezed the juice from the lemon into a bowl befor you start, ready to be used, rather than squeezing the lemon directly over the cooking pan. This latter way, there’s a risk of the seeds of the lemon falling in to the potatoes and then ending up in your mouth. Not good…

For  a  “hot” flavor, you could add some chopped green chillies (to taste) along with the mustard and cumin.

Anyway you make it, this dish tastes great !

Leave a comment

Filed under Easy One Pot Cooking, Everyday Subzis, Picnic Food, Salads, Starters and Snacks, Versatile Accompaniments

Indira’s Favorite Date Muffins

This afternoon, the school mums group had organized a little gouter (as the afternoon snack is called) in the primary school canteen.

This is an annual end-of-the-school-year event, at which the children in the various classes gift the collective presents from their families to their teachers.

It is the mums who usually provide the snacks and drinks and I took along Indira’s favorite after-school snack, which is date muffins.

When she was much younger, she assumed that any brown colored food was chocolate.  I was happy to exploit this misconception, and routinely made cakes and muffins with dates instead of chocolate.

This is not to say that she has been spared a fondness for chocolate. But she does love dates too, in any form, which I consider an adequate reward for my efforts.

At the gouter today, too, I was glad to see that the muffins were well-liked.

This is my recipe –

Date Muffins (or “muff-uns”, as Noor calls them)

(makes around 16)

1 and a 1/2 cups of finely chopped soft dates

3/4 cup of very hot water (just boiled)

1 tsp baking soda

2 eggs

1/4 cup (a 160 ml cup) unsalted butter

3/4 cup brown sugar

1 and 1/2 tsp vanilla

1 and 3/4 cup refined or wholewheat flour (I use the latter when baking for the girls, but you may want to use white flour. The difference in taste is not very significant, to my mind, and hence I stick with wholewheat flour since that packs more nutrition)

1tsp baking powder

1/2 tsp salt

Mix the first 3 ingredients and leave to cool. Next, mix the last 3 ingredients in a bowl and keep aside.

Beat the eggs till they are frothy, then add melted butter and sugar, and beat again till these 3 things are well-blended.

Once the date mixture has cooled, add it to the eggs-butter-sugar mixture and mix a couple of times to blend. Now add the flour mixture, and mix everything together so the flour is well-blended.

While you mix everything together as described above, remember to switch your oven on, so as to pre-heat it for 5-8 minutes, to 180°C.

Fill the muffin moulds 1/2 to 3/4 full, and bake for 20-25 minutes.

These muffins are extra nice with a scoop of vanilla ice-cream on the side, if you really want to make this in to a fancy dessert or really indulge the kids.

2 Comments

Filed under Breakfast Ideas, Cakes and Muffins, Picnic Food, Starters and Snacks

Shakkarparas

I remember one time, when I went back home for Diwali after I had started working. My brother was going to come too, and my mother started to make shakkarparas as a welcome treat, since this was always  one of his favorite meetha snacks. When she got to the part where the fried paras have to be turned in the gradually-crystallizing sugar syrup(this can be quite tiring), she let out a sigh of exhaustion and said – “there is no one else I will do this for anymore, except Bittu”.

I understood what she meant only when I made shakkarparas all by myself for the first time 3 years ago, for the “Cuisine du Monde” day at Indira’s kindergarten.

It sure is hard work, but well worth the trouble when you see little faces tentatively munching first a small half of one para to try what it tastes like, then coming back for a handful.

Here’s my mother’s recipe for this delicious treat.

500 gms of refined flour

220-250 gms of oil

300-400 gms of milk

500 gms of sugar

Add a pich of salt to the flour and then gradually mix in the oil.

Now make a stiff dough using 300-400 gms of lukewarm milk.

Divide the dough into 4-5 equal-sized balls and roll out each to a thickness of 1/4 cm.

Cut the sheets you thus obtain into little squares (no bigger than 3cm by 3cm or they could break when you are turning them in the syrup, in the next step) and fry these until they turn a light brown, in medium-hot oil.

While you fry the paras, dissolve the sugar in one cup (200ml measure) of water in a large pan (like a wok) and heat till a 2-strand syrup is formed or till you start to see a slight deposit of sugar forming on the side of the pan.

Now add the fried squares to this syrup and toss them gently in the syrup over a moderately hot setting until the syrup has completely dried up. At this point, the squares will be well-coated with an almost powdery deposit of crystallized sugar.

Make sure to stir the shakkarparas from time to time to keep them from sticking to each other, while the syrup dries.

Guaranteed to please young and old alike !!

Leave a comment

Filed under Picnic Food, Starters and Snacks